
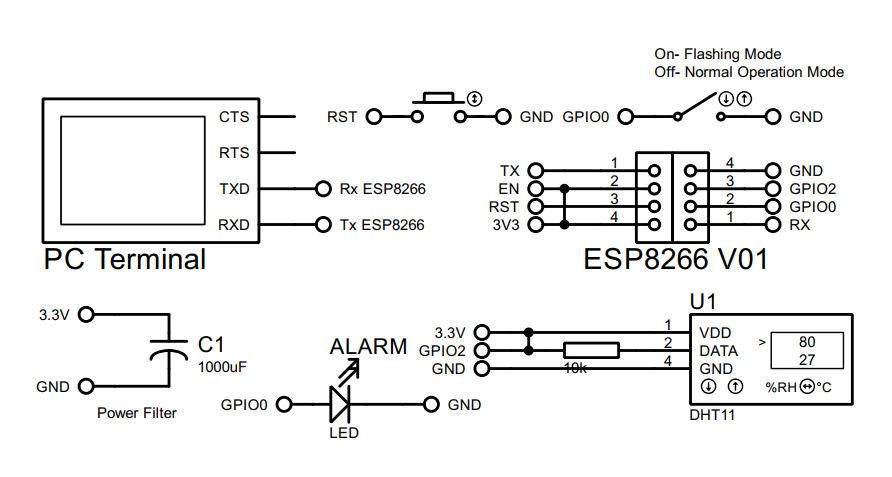
In our previous Article we communicate with whatsAPP through WhatABoT medium. In this article we introduce another medium CallMeBoT. It has very simple & powerful feature for whatsAPP notification. One drawback is that it doesn’t received msg & it is used only for notify. In this project we use DHT11 sensor to read Temperature & Humidity through GPIO2 pin of ESP01 & if temperature above 25 °C GPIO0 pin will on to trigger an alarm. CallMeBoT will display data every 2 minutes. First go to the following website & process the step for registration-
- Add the phone number +34 644 87 21 57 into your Phone Contacts. (Name it it as you wish)
- Send this message “I allow callmebot to send me messages” to the new Contact created (using WhatsApp of course)
- Wait until you receive the message “API Activated for your phone number. Your APIKEY is 123123” from the bot.
Note: If you don’t receive the ApiKey in 2 minutes, please try again after 24hs. The WhatsApp message from the bot will contain the apikey needed to send messages using the API.
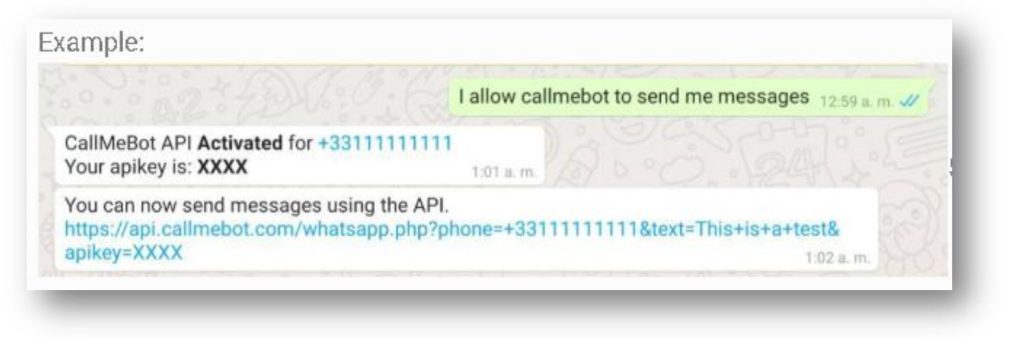
After successful registration you can send msg using GET mothod. Since it is a get method you can use either browser or POSTMAN application for testing. Format with Example-
https://api.callmebot.com/whatsapp.php?phone=[phone_number]&text=[message]&apikey=[your_apikey]
https://api.callmebot.com/whatsapp.php?phone=880XXXXXXXXXX&text=”This is a test Data”&apikey=XXXXXXX
Here you have to enter your full SIM number without + sign. Since I live in Bangladesh, so I use 880 as my country code, India 91, Pakistan 92, Nepal 977 , Sri Lanka 94, USA 1 , UAE 971 etc. Remember CallMeBoT phone number +34 644 87 21 57 need to save with + sign, otherwise BOT will not active.
Lets look at the Conection Diagram-
Now it times to download some driver for our project. Let’s begin with some settings-
- Install the latest version of Arduino : https://www.arduino.cc/en/software/
- In Arduino: File>Preferences>Setting : http://arduino.esp8266.com/stable/package_esp8266com_index.json
- In Arduino Install: Tools>Board>esp8266
- In Arduino: Tools>Board>esp8266>Generic ESP8266 Module
- In Arduino Install: Library Manager > DHT sensor library
Here interesting that the data must transmit through URL encoding method. URL encoding transforms characters that are not safe or have special meaning in URLs into a format that can be transmitted reliably across the internet. URL encoding, also known as percent-encoding, is a mechanism used to encode special characters in URLs so that they can be safely transmitted over the internet. Since URLs can only be sent over the Internet using the ASCII character set, characters outside this set or characters with special meanings (like spaces, punctuation, or non-ASCII characters) need to be encoded. Special characters are replaced with a percent sign (“%”) followed by two hexadecimal digits representing the character’s ASCII value.
For example:
Space (” “) becomes “%20” “@” becomes “%40” “/” becomes “%2F” “&” becomes “%26” etc.
Example: > Original string:
Hello World! & Welcome to IoTthingHuB.
URL-encoded: Hello%20World%21%20%26%20Welcome%20to%20 IoTthingHuB.
Example a simple C code for converting URL Encode-
#include <stdio.h>
#include <stdlib.h>
#include <string.h>
#include <ctype.h>

// Function to convert a single character to its percent-encoded form
void url_encode_char(char c, char *output) {
    sprintf(output, "%%%02X", (unsigned char)c);
}

// Function to determine if a character is safe (unreserved) in URL
int is_unreserved_char(char c) {
    if (isalnum(c) || c == '-' || c == '_' || c == '.' || c == '~') {
        return 1;
    }
    return 0;
}

// Function to URL-encode a string
char *url_encode(const char *str) {
    size_t len = strlen(str);
    // Allocate enough space: worst case all characters need encoding (3 chars each)
    size_t max_encoded_len = len * 3 + 1;
    char *encoded = malloc(max_encoded_len);
    if (encoded == NULL) {
        printf("Memory allocation failed.\n");
        exit(1);
    }

    char *p = encoded;

    for (size_t i = 0; i < len; i++) {
        char c = str[i];
        if (is_unreserved_char(c)) {
            *p++ = c;  // Safe character, copy as is
        } else {
            // Encode character
            sprintf(p, "%%%02X", (unsigned char)c);
            p += 3;
        }
    }
    *p = '\0'; // Null-terminate the string
    return encoded;
}

int main() {
    const char *original = "Hello World! & Welcome to IoTthingHuB.";
    char *encoded = url_encode(original);

    printf("Original: %s\n", original);
    printf("URL Encoded: %s\n", encoded);

    free(encoded);
    return 0;
}
Run on C platform & you will see the output or you can use a browser : https://www.programiz.com/c-programming/online-compiler/ & paste the program. For reading Temperature & Humidity from DHT11 as-
#include <DHT.h>
// DHT11 Configuration
#define DHTPIN 2             // GPIO2 for DHT11 Sensor
#define DHTTYPE DHT11
DHT dht(DHTPIN, DHTTYPE);

dht.begin();

  float temperature = dht.readTemperature();
  float humidity = dht.readHumidity();

  if (isnan(temperature) || isnan(humidity)) {
    Serial.println("Failed to read from DHT sensor!");
    return;
  }
For transfer data to WhatsAPP it shows HTTPS protocol with port 80, so we just use HTTP protocol & the browser address with http not https. Example to send data to WhatsAPP-
// WiFi Credentials
const char* ssid =  "Your_WiFi_Name" ;        // Your WiFi Name
const char* password = "Your_WiFi_Password";  // Your WiFi Password

// CallMeBot API
String phoneNumber = "880xxxxxxxxxx";         // Your full WhatsApp number with country code ignore + sign
String apiKey = "xxxxxxx";                    // Your API Key

WiFiClient client;
HTTPClient http;

Serial.begin(115200);
  WiFi.begin(ssid, password);

  Serial.print("Connecting to WiFi");
  while (WiFi.status() != WL_CONNECTED) {
    delay(500);
    Serial.print(".");
  }
  Serial.println("\nWiFi connected");

String message = "🌡 Temp: " + String(temperature, 2) + "°C \r\n 💧 Humidity: " + String(humidity, 2) + "%";

  Serial.println("Sending to WhatsApp: " + message);
  String WhatsAppmsg = url_encode (message);    // From the C Function

  if (WiFi.status() == WL_CONNECTED) {
    String url = "http://api.callmebot.com/whatsapp.php?phone=" + phoneNumber +
                 "&text=" + WhatsAppmsg +
                 "&apikey=" + apiKey;

    http.begin(client, url);
    int httpCode = http.GET();

    if (httpCode > 0) {
      Serial.println("Message sent successfully.");
    } else {
      Serial.print("Error sending message: ");
      Serial.println(http.errorToString(httpCode).c_str());
    }
    http.end();
One important thing that every time you call HTTP GET method you have to terminate with HTTP END method. If the connection not closed it will not transmit next msg.


 IoTthingHuB


 Visit Today : 57
 Total Visit : 41173