
In this article we learn something different, something new. We will develop a full website to display your sensor data in your own website. The website hosting & domain is full free & support pHp script for your works. Let’s start. At first you have to sign in the following website along with only your email address, no other personal data-
Website : https://www.awardspace.com/
For creating & setup your first website please sees my YouTube Video. Since it involves lots of steps & all steps are in the Video. Since it involve no coding just watch the video & create your first site. Now let’s move on the process. In the file manager section expend the parameter & in <wp-content> section pastes a pHp file. The section is something like this-
https://cp1.awardspace.net/file-manager/www/YourDomain.atwebpages.com/wp-content
The pHp file-
<?php
header("Access-Control-Allow-Origin: *");
header("Content-Type: application/json");

$dataFile = __DIR__ . '/sensor-data.json';

if ($_SERVER['REQUEST_METHOD'] === 'POST') {
    $temperature = $_POST['temperature'] ?? null;
    $humidity = $_POST['humidity'] ?? null;

    if ($temperature !== null && $humidity !== null) {
         $data = $ temperature . "," . $ humidity;
        file_put_contents($dataFile, json_encode([
            'temperature' => $temperature,
            'humidity' => $humidity,
            'timestamp' => date('Y-m-d H:i:s')
        ]));
        file_put_contents("sensor-data.txt", $data);
        echo json_encode(['status' => 'success']);
    } else {
        echo json_encode(['status' => 'error', 'message' => 'Missing fields']);
    }
    exit;
}

if (file_exists($dataFile)) {
    echo file_get_contents($dataFile);
} else {
    echo json_encode(['temperature' => null, 'humidity' => null]);
}
This is a very simple file with no API key & email notification. It is used for your testing purpose. In my previous article we develop a program to send heat alarm to my WhatsApp number. You can use that CallMeBoT function for WhatsApp notification. Name any to your pHp file. Let’s check if our pHp file works or not. Paste YourDomain & pHpName with your original domain & pHp name & hit enter button into the browser-
http://YourDomain.atwebpages.com/wp-content/pHpName.php
You Get something like this in JSON format.
temperature      : " null "
humidity         : " null "
Now it’s time to send some data to the pHp server. The HTTP POST method is used to send data to a server to create or update a resource. Unlike GET requests, which append parameters to the URL, POST requests include data in the request body, making them more secure and suitable for larger payloads.
How to Send a POST Request: -X POST: Specifies the HTTP method, -H: Adds headers (e.g., Content-Type, -d: Includes the request body. POST Request Body Formats-
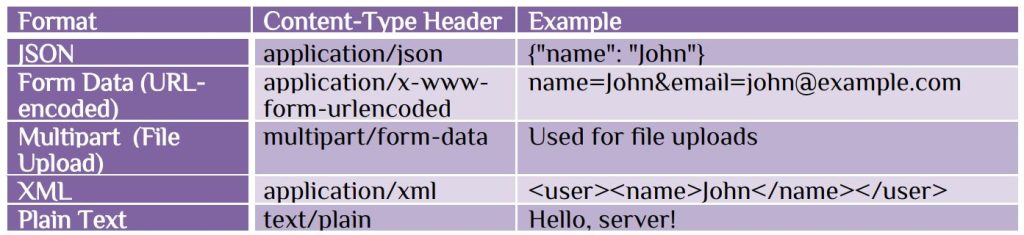
Important Headers in POST Requests –

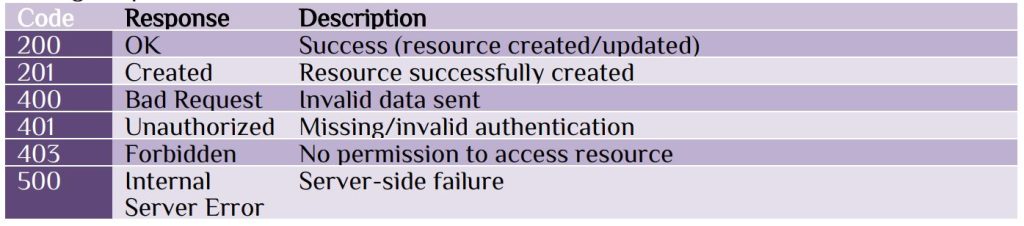
Handling Responses: Common HTTP Status Codes-
In postman application-
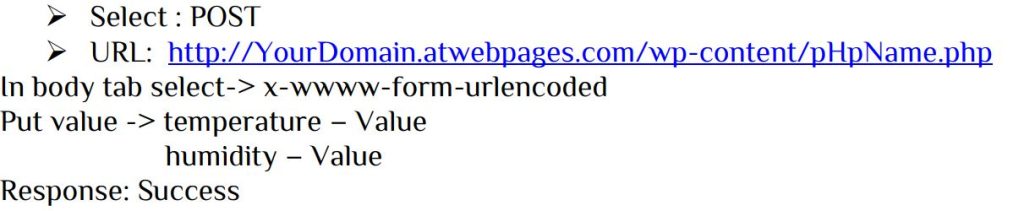
Since our browser only support GET request, so that we can’t test it on browser. Whatever value you put you get the value by entering the URL into the browser. If you get any error just simply see my YouTube Video, it will help you. Second step is to create a HTML request from your server. You can do it by creating a Custom HTML section in a new article. You have to paste the following program to the Custom HTML part-
<div id="sensor">
  <p> Temp: <span id="temp">--</span> °C</p>
  <p> Humidity: <span id="hum">--</span> %</p>
  <p>Last updated: <span id="time">--</span></p>
</div>

<script>
async function loadSensorData() {
  try {
    const res = await fetch('/wp-content/sensor- sensor-data.txt ');
    const data = await res.json();
    document.getElementById("temp").textContent = data.temperature;
    document.getElementById("hum").textContent = data.humidity;
    document.getElementById('time').textContent = data.timestamp;
  } catch (e) {
    console.error("Error fetching sensor data:", e);
  }
}
setInterval(loadSensorData, 1);
loadSensorData();
</script>
This script will display the data of temperature & humidity of the pHp file. You can check the changing of data using POSTMAN application. Now the final step is the programming section of Arduino. Now it times to download some driver for our project. Let’s begin with some settings-
- Install the latest version of Arduino : https://www.arduino.cc/en/software/
- In Arduino: File>Preferences>Setting > http://arduino.esp8266.com/stable/package_esp8266com_index.json
- In Arduino Install: Tools>Board>esp8266
- In Arduino: Tools>Board>esp8266>Generic ESP8266 Module
- In Arduino Install: Library Manager > DHT sensor library
Final Code For Ardino:
#include <ESP8266WiFi.h>
#include <ESP8266HTTPClient.h>
#include <WiFiClient.h>
#include <DHT.h>

// WiFi credentials
const char* ssid = "YourWiFiName";
const char* password = "YourWiFiPassword";

// Your server URL
const char* serverUrl = "http://YourDomain.atwebpages.com/wp-content/phpName.php";

// DHT11 settings
#define DHTPIN 2     // GPIO2 of ESP01
#define DHTTYPE DHT11
DHT dht(DHTPIN, DHTTYPE);
// Create a WiFiClient
WiFiClient client;
void setup() {
  Serial.begin(115200);
  WiFi.begin(ssid, password);
  dht.begin();

  Serial.println("Connecting to WiFi...");
  while (WiFi.status() != WL_CONNECTED) {
    delay(500);
    Serial.print(".");
  }
  Serial.println("");
  Serial.println("WiFi connected");
}

void loop() {
  if (WiFi.status() == WL_CONNECTED) {
    float humidity = dht.readHumidity();
    float temperature = dht.readTemperature();

    if (isnan(humidity) || isnan(temperature)) {
      Serial.println("Failed to read from DHT sensor!");
      return;
    }
    Serial.printf("Temperature : %.2f °C \r\n", temperature);
    Serial.printf("Humidity : %.2f %% \r\n", humidity);
    HTTPClient http;
    http.begin(client, serverUrl);
    http.addHeader("Content-Type", "application/x-www-form-urlencoded");

    // Build the POST data
    String postData = "temperature=" + String(temperature, 1) + "&humidity=" + String(humidity, 1);

    int httpResponseCode = http.POST(postData);

    if (httpResponseCode > 0) {
      Serial.print("HTTP Response code: ");
      Serial.println(httpResponseCode);
      Serial.println(http.getString());
    } else {
      Serial.print("Error on sending POST: ");
      Serial.println(httpResponseCode);
    }

    http.end(); // Free resources
  } else {
    Serial.println("WiFi Disconnected, trying to reconnect...");
    WiFi.begin(ssid, password);
  }

  delay(10000); // Send data every 10 seconds
}
For Arduino program we use http.addHeader(“Content-Type”, “application/x-www-form-urlencoded”) for proper Header for POST request & http.POST method for posting data. One important thing that every time you request for a POST method you must terminate with http.end() method otherwise the request give an error signal. Don’t use 2 time http.end() at the same time, it’s also give an error signal. One interesting thing that at first time we setup for a server it respond the first time will and in next time its shows error response signal & frequently WiFi disconnected. This issue arise when Power Problem. In that situation just solder the all component either in PCB or PCB board, avoid breadboard.


 IoTthingHuB


 Visit Today : 57
 Total Visit : 41173