
Atmel family has another type of Timer to watch the program flow. We can enable the timer and if error occurs it will restart the CPU. So much we are excited, for it is hard to succeed developing absolutely perfect and error free program. The watchdog cannot help us to better programs however it can ensure that our program, if it said good-by and the µC start again. Let’s write a program to set PORTB of ATmega32 from bottom to top. Let’s write the program-
  #include<avr/io.h>
  #include<util/delay.h>
int main(void)
{
   DDRB=0xff;
   uint8_t x=7;
   while(1)
   {
    while(x>=0)
      {
        PORTB=(1<<x); _delay_ms(80);
        x--;
      }
   x=7;
  }
return 0;
}
It seems like in a continuous loop i.e. while(1) PORTB is set from bottom to top and again from bottom to top and the process continue. But if you run the program and simulate in proteus or in real life it is seen that PORTB will set from PINB7 to PINB0 and the loop terminate there. No repeat, so what happen? Completely simply, because as unsigned defined variable can never become smaller than zero. But the compiler does not give any warning or error? The program would hang itself up in here and would turn eternally in the loop. And here the watchdog comes exactly to the course. The watchdog cannot correct the program but start from beginning just like RESET. It simply gives some time to execute, if the execution hanged itself than it RESET the microcontroller and start from begin. We will discuss this in this article however the correction in the above program is replace the uint8_t x=7 with int8_t x=7.
The Watchdog contains a separate timer/Counter, which with an internally produced clock by 1MHz with 5V one clocks, so no need for external timer. It is already calculated for every microcontroller without the effect of internal or external oscillator. Let’s first see the control register and there uses
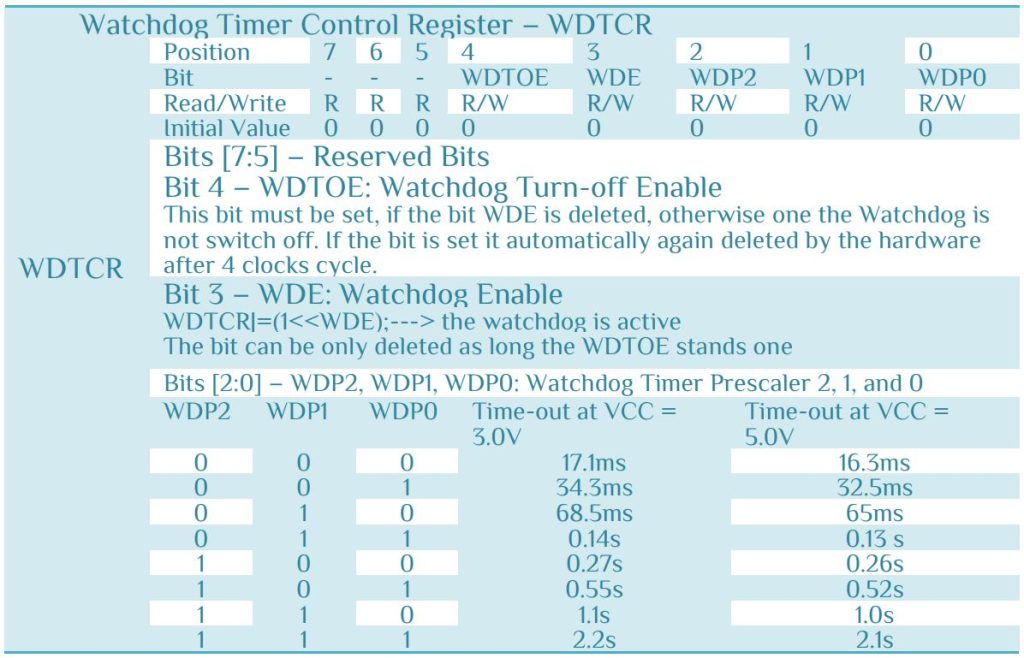
You can use register from the table or the function available in the #include<avr/wdt.h> library. Let use both. To enable the Watchdog –
WDTCR|=(1<<WDE); or wdt_enable(WDTO_xS);
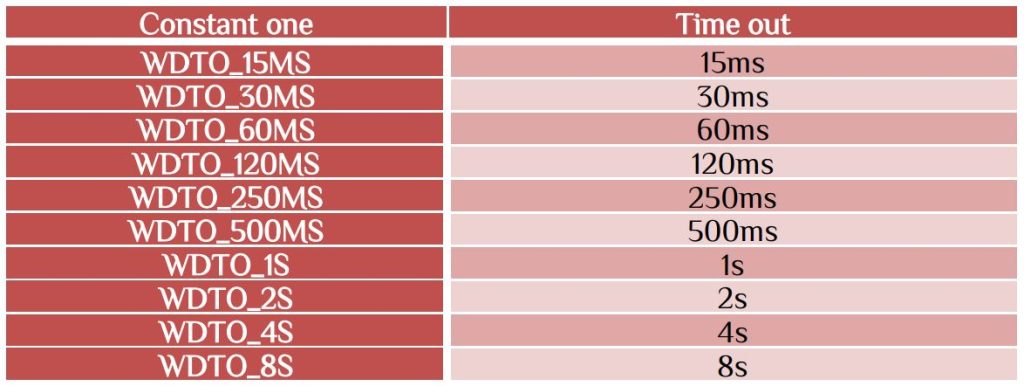
Enable the watchdog timer, configuring it for expiry after timeout (which is a combination of the WDP0 through WDP2 bits to write into the WDTCR register; for those devices that have a WDTCSR register, it uses the combination of the WDP0 through WDP3 bits). Some Timeout values and pre-defined as constants and some are listed according to the bit setting.
For use the time out condition see the bits available as watchdog timer prescaler.
To disable watchdog
The bet can be only deleted as long as the bit WDTOE stands to 1. That means after you enable Watchdog timer the thing you need is
WDTCR |= (1<<WDTOE) | (1<<WDE); or wdt_disable(); [use the #include<avr/wdt.h>]
Let’s change the program which is discuss at the beginning by replacing the uint8_t with int8_t and set the watchdog timer to check our logic. If the logic is correct then the watchdog disable otherwise it reset the microcontroller. Let the process be seen by our self. In that case we set a PINB0 of ATmega8 and it is clear if the loop success. The full code as follow-
  #include<avr/io.h>
  #include<util/delay.h>
  #include<avr/wdt.h>
int main(void)
{
  DDRD=0xff;
  DDRB|=(1<<DDB0);
  PORTB|=(1<<PINB0);
  _delay_ms(800);
  /************ Turn on WTD  ****************/
  wdt_enable(WDTO_1S);
  //WDTCR|=(1<<WDE);
  //WDTCR |=(1<<WDP2)|(1<<WDP1);//time out condition 1s
  /******************************************/
  uint8_t x=7;
  while(1)
  {
     while(x>=0)
	    {
		  PORTD=(1<<x); _delay_ms(50);
		  x--;
	    }
	 x=7;
  /************ Turn off WDT *****************/
  //wdt_disable();
  WDTCR |= (1<<WDCE) | (1<<WDE);
  WDTCR = 0x00;
  /*******************************************/
  PORTB&=~(1<<PINB0);
  }
 return 0;
}
Here int8_t can have both positive and negative value. So the watchdog timer disable before 2s timeout. Now your task is to check the program by replacing int8_t with uint8_t and see what happen?
This type of Timer is very useful in sensor application and time-out condition. Be careful in using this Timer. Let’s check the sensor condition DHT11 temperature sensor.
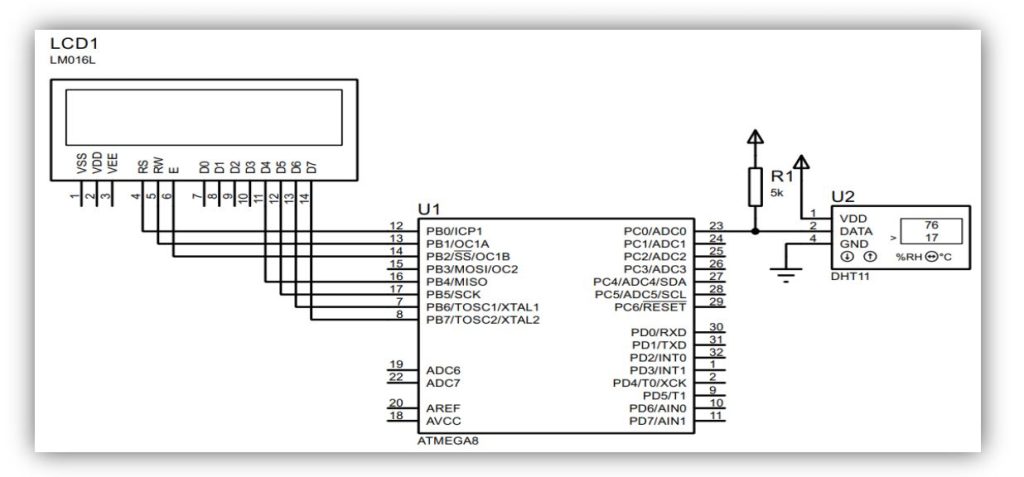
Connect PC0 with DHT11 sensor. If the sensor pin is disconnect then it will show sensor error and it will restart again and again unless sensor is properly connected. Download the hex file and try it.


 Electronic Real Wrold


 Visit Today : 136
 Total Visit : 34313