
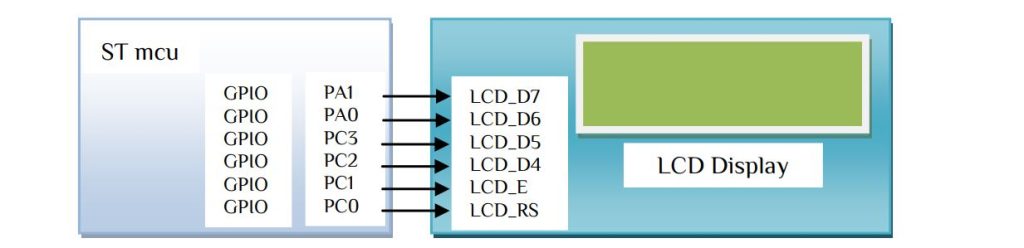
In this article we interface LCD display with STmirccontroller. Please see my LCD interface section in ATmel part. We use STM32F0308-DISCO board in this interface. Similarly other ST can be interface in same manner. We can use any GPIO pins. Let’s first make a connection and change the logic according to the GPIO pins-
Since we only write so connect R/W to GND. In the LCD display the function of R/S pin is-


Let’s just send 0x28 command for 2 lines and 5×7 matrix (4-bit mode). Since we use only 4 upper bits, we have to send the Upper 4 bits then lower 4 bits. Let’s make a function for that works-
void nibble_cmd(unsigned char LCD_value)
{
unsigned char display_nibble;
display_nibble=LCD_value&0xF0;           //mask lower nibble because DD4-DD7 pins are used
LCD_cmd(display_nibble);                 //Send upper Nibble
display_nibble=((LCD_value<<4) & 0xF0);  //mask the upper Nibble
LCD_cmd(display_nibble);                 //Send lower Nibble
}
In this user file we just separate the bits and first send the upper 4 bits then lower 4 bits. The void LCD_cmd(unsigned char cmd) -> function is used to send the 4 bits. Let’s look at the function and how it works-
void LCD_cmd(unsigned char cmd)
{
	HAL_GPIO_WritePin(GPIOC, GPIO_PIN_0,GPIO_PIN_RESET);                 // LCD_RS low
	if(cmd_4BIT&0x80) HAL_GPIO_WritePin(GPIOA, GPIO_PIN_1,GPIO_PIN_SET); // LCD_D7 high
	else HAL_GPIO_WritePin(GPIOA, GPIO_PIN_1,GPIO_PIN_RESET);            // LCD_D7 low
	if(cmd_4BIT&0x40) HAL_GPIO_WritePin(GPIOA, GPIO_PIN_0,GPIO_PIN_SET); // LCD_D6 high
	else HAL_GPIO_WritePin(GPIOA, GPIO_PIN_0,GPIO_PIN_RESET);            // LCD_D6 low
	if(cmd_4BIT&0x20) HAL_GPIO_WritePin(GPIOC, GPIO_PIN_3,GPIO_PIN_SET); // LCD_D5 high
	else HAL_GPIO_WritePin(GPIOC, GPIO_PIN_3,GPIO_PIN_RESET);            // LCD_D5 low
	if(cmd_4BIT&0x10) HAL_GPIO_WritePin(GPIOC, GPIO_PIN_2,GPIO_PIN_SET); // LCD_D4 high
	else HAL_GPIO_WritePin(GPIOC, GPIO_PIN_2,GPIO_PIN_RESET);            // LCD_D4 low
	HAL_GPIO_WritePin(GPIOC, GPIO_PIN_1,GPIO_PIN_SET);                   // LCD_E high
	for(uint8_t i=0;i<200;i++);
	__nop();
	HAL_GPIO_WritePin(GPIOC, GPIO_PIN_1,GPIO_PIN_RESET);                 // LCD_E low
	HAL_Delay(3);
}
In both Command or Data write the LCD pin E need to high then after some delay turn the E pin low. We use __nop(); -> no operation function for E pin. Similarly if we wand display character ‘A’ or 0x41 the only parameter that need to change is the RS pin to high. i.e.-
void LCD_write(unsigned char data)
{
	HAL_GPIO_WritePin(GPIOC, GPIO_PIN_0,GPIO_PIN_SET);                   // LCD_RS high
	if(cmd_4BIT&0x80) HAL_GPIO_WritePin(GPIOA, GPIO_PIN_1,GPIO_PIN_SET); // LCD_D7 high
	else HAL_GPIO_WritePin(GPIOA, GPIO_PIN_1,GPIO_PIN_RESET);            // LCD_D7 low
	if(cmd_4BIT&0x40) HAL_GPIO_WritePin(GPIOA, GPIO_PIN_0,GPIO_PIN_SET); // LCD_D6 high
	else HAL_GPIO_WritePin(GPIOA, GPIO_PIN_0,GPIO_PIN_RESET);            // LCD_D6 low
	if(cmd_4BIT&0x20) HAL_GPIO_WritePin(GPIOC, GPIO_PIN_3,GPIO_PIN_SET); // LCD_D5 high
	else HAL_GPIO_WritePin(GPIOC, GPIO_PIN_3,GPIO_PIN_RESET);            // LCD_D5 low
	if(cmd_4BIT&0x10) HAL_GPIO_WritePin(GPIOC, GPIO_PIN_2,GPIO_PIN_SET); // LCD_D4 high
	else HAL_GPIO_WritePin(GPIOC, GPIO_PIN_2,GPIO_PIN_RESET);            // LCD_D4 low
	HAL_GPIO_WritePin(GPIOC, GPIO_PIN_1,GPIO_PIN_SET);                   // LCD_E high
	for(uint8_t i=0;i<200;i++);
	__nop();
	HAL_GPIO_WritePin(GPIOC, GPIO_PIN_1,GPIO_PIN_RESET);                 // LCD_E low
	HAL_Delay(3);
}
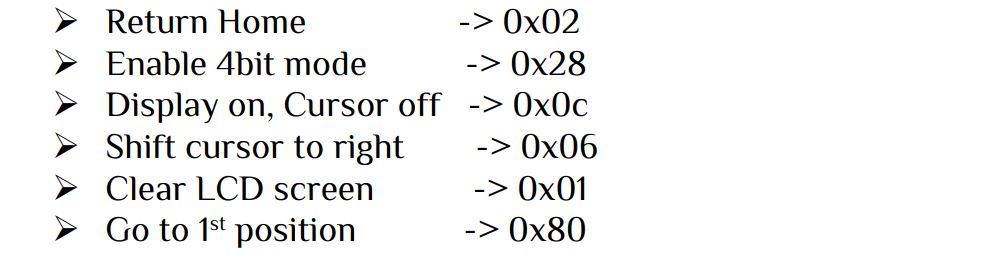
We done with command & data section, let’s initialize the LCD display with 4bits mode with the following commands-
Now send data to the exact positions-

void LCD_write_string(unsigned char x, unsigned char y, unsigned char *str)
{
  unsigned char lcd_address[4]={0x80,0xc0,0x90,0xd0};
  nibble_cmd(lcd_address[y-1]+x-1);
  uint8_t i=0;
	while(str[i]!='\0')       // loop will go on till the NULL character in the string
	{
	  nibble_data(str[i]);      // sending data on LCD byte by byte
	  i++;
	}
}
Just paste it in the main program in while(1) and see what happened-
        LCD_write_custom(1,1,0);
		LCD_write_custom(2,1,1);
		LCD_write_custom(2,2,2);
		LCD_write_custom(1,2,4);
		LCD_write_custom(5,2,3);
		LCD_write_string(6,2,"IoTthingHuB");
		LCD_write_string(5,1,"        www");HAL_Delay(500);
		LCD_write_string(5,1,"       www.");HAL_Delay(500);
		LCD_write_string(5,1,"      www.i");HAL_Delay(500);
		LCD_write_string(5,1,"     www.io");HAL_Delay(500);
		LCD_write_string(5,1,"    www.iot");HAL_Delay(500);
		LCD_write_string(5,1,"   www.iott");HAL_Delay(500);
		LCD_write_string(5,1,"  www.iotth");HAL_Delay(500);
		LCD_write_string(5,1," www.iotthi");HAL_Delay(500);
		LCD_write_string(5,1,"www.iotthin");HAL_Delay(500);
		LCD_write_string(5,1,"ww.iotthing");HAL_Delay(500);
		LCD_write_string(5,1,"w.iotthingh");HAL_Delay(500);
		LCD_write_string(5,1,".iotthinghu");HAL_Delay(500);
		LCD_write_string(5,1,"iotthinghub");HAL_Delay(500);
		LCD_write_string(5,1,"otthinghub.");HAL_Delay(500);
		LCD_write_string(5,1,"tthinghub.c");HAL_Delay(500);
		LCD_write_string(5,1,"thinghub.co");HAL_Delay(500);
		LCD_write_string(5,1,"hinghub.com");HAL_Delay(500);
		LCD_write_string(5,1,"inghub.com ");HAL_Delay(500);
		LCD_write_string(5,1,"nghub.com  ");HAL_Delay(500);
		LCD_write_string(5,1,"ghub.com   ");HAL_Delay(500);
		LCD_write_string(5,1,"hub.com    ");HAL_Delay(500);
		LCD_write_string(5,1,"ub.com     ");HAL_Delay(500);
		LCD_write_string(5,1,"b.com      ");HAL_Delay(500);
		LCD_write_string(5,1,".com       ");HAL_Delay(500);
		LCD_write_string(5,1,"com        ");HAL_Delay(500);
		LCD_write_string(5,1,"om        w");HAL_Delay(500);
		LCD_write_string(5,1,"m        ww");HAL_Delay(500);
		LCD_write_string(5,1,"        www");HAL_Delay(500);
For display custom character into LCD display please see my Build your own custom character article.
After connect LCD with STmicrocontroller sometime the LCD display shown no contents, in this case vary the variable resistance slowly until the display show characters. The contract adjust is very essential in LCD display so care should be taken. Some time the display may hang reset the mcu then try.


 Electronic Real Wrold


 Visit Today : 132
 Total Visit : 34309