
The STM8S access line 8-bit microcontrollers offer 8 Kbytes Flash program memory, plus integrated true data EEPROM. It is a low cost device and very powerful. It has internal 16 MHz CPU clock frequency, robust I/O, independent watchdogs with separate clock source, clock security system, SPI, UART, I2C etc. It has a single wire (SWIM) interface module and debug module permits non-intrusive, real-time in-circuit debugging and fast memory programming. It will be very useful in small projects, but in this article will only discuss about only GPIO. One GPIO pin will be input and another GPIO pin will be output. The input signal will be given by a capacitive touch switch. Capacitive touch switch has only 3 pins Vcc (ranges from 2.5 to 5.5V), Ground and one I/O pin which return the logical value. If finger touch the I/O output will be 1 otherwise 0.

For developing purpose we need an IDE, Compiler & Burner. Download the following software-
- ST Visual Programmer STM8(It include ST Visual Develop & ST Visual Programmer)
- COSMIC STM8 compiler.
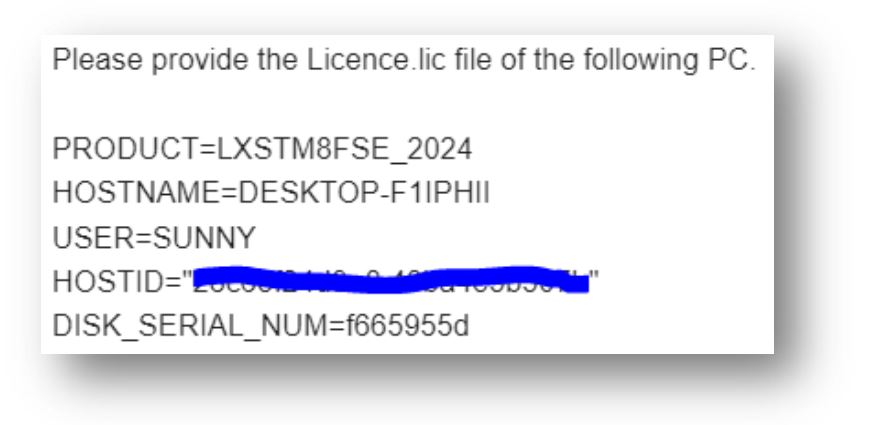
ST Visual Programmer STM8 package include an IDE : ST Visual Develop & burner : ST Visual Programmer. The COSMIC STM8 compiler package doesn’t include license.lic file. When you install the COSMIC software they will provide license.lic file within a few hours via mail. If they don’t mail you after a couple of hours then you have to mail at stm8_free@cosmic.fr with your Machine ID information.
For your simplicity I just attached the mail body file. When the compiler ask for your license.lic file just browse it. Or just copy your license file to – C:\Program Files (x86)\COSMIC\FSE_Compilers\CXSTM8\License.
Like STM32 mcu the STM8 has libraries. Download the driver library, it include all peripherals library function i.e. GPIO, I2C, SPI, UART etc.
Here we will discuss about the GPIO library, which include stm8s_gpio.c & stm8s_gpio.h file. Some user functions as follow-
//Initializes the GPIOx according to the specified parameters
GPIO_Init(GPIO_TypeDef* GPIOx, GPIO_Pin_TypeDef GPIO_Pin, GPIO_Mode_TypeDef GPIO_Mode);
//Writes data to the specified GPIO data port
GPIO_Write(GPIO_TypeDef* GPIOx, uint8_t PortVal);
//Writes high level to the specified GPIO pins
GPIO_WriteHigh(GPIO_TypeDef* GPIOx, GPIO_Pin_TypeDef PortPins);
//Writes low level to the specified GPIO pins
GPIO_WriteLow(GPIO_TypeDef* GPIOx, GPIO_Pin_TypeDef PortPins);
//Writes reverse level to the specified GPIO pins
GPIO_WriteReverse(GPIO_TypeDef* GPIOx, GPIO_Pin_TypeDef PortPins);
//Reads the specified GPIO output data port
GPIO_ReadOutputData(GPIO_TypeDef* GPIOx);
//Reads the specified GPIO input data port
GPIO_ReadInputData(GPIO_TypeDef* GPIOx);
//Reads the specified GPIO input data pin
GPIO_ReadInputPin(GPIO_TypeDef* GPIOx, GPIO_Pin_TypeDef GPIO_Pin);
//Configures the external pull-up on GPIOx pins
GPIO_ExternalPullUpConfig(GPIO_TypeDef* GPIOx, GPIO_Pin_TypeDef GPIO_Pin, FunctionalState NewState);
Our target is to read one GPIO pin with no pull-up enable and set/reset one GPIO output pin according to the input pin.
- GPIO PB4 as input (connect capacitive touch I/O pin)
- GPIO PD5 as output
First we have to initial GPIO according to logic-
GPIO_Init(GPIOB,GPIO_PIN_4,GPIO_MODE_IN_FL_NO_IT);    //PB4 as input
GPIO_Init(GPIOD,GPIO_PIN_5,GPIO_MODE_OUT_PP_LOW_FAST);//PD5 as output
Initialization has been done. The full program as follow-
#include "stm8s_gpio.h"
main()
{
	GPIO_Init(GPIOD,GPIO_PIN_5,GPIO_MODE_OUT_PP_LOW_FAST);
	GPIO_Init(GPIOB,GPIO_PIN_4,GPIO_MODE_IN_FL_NO_IT);
	while (1)
            {
              if(GPIO_ReadInputPin(GPIOB,GPIO_PIN_4))
              GPIO_WriteHigh(GPIOD,GPIO_PIN_5);
              else GPIO_WriteLow(GPIOD,GPIO_PIN_5);
            }
}
Our programming part is done. It will generate .s19 file, the next step is to load the file in STM8. Here we use STM8S103F3P6 low cost mcu, first change the setting of ST Visual Programmer-
Hardware         : ST-LINK
PORT             : USB
Programming mode : SWIM
Device           : STM8S103F3
Only 1 pin will be require for programming, that is SWIM. Connect USB power supply to the module and SWIM pin to ST-Link SWIM pin. If you are using external power supply to power the module then connect GND pin of ST-Link to the GND pin.


 Electronic Real Wrold


 Visit Today : 136
 Total Visit : 34313