
The Universal Serial Bus (USB) is technology that allows a person to connect an electronic device to a computer. It is a fast serial bus type. The STM32 performance line embeds a USB device peripheral compatible with the USB full-speed 12 Mb/s. The USB interface implements a full-speed (12 Mbit/s) function interface. It has software-configurable endpoint setting and suspend/resume support. The USB peripheral implements an interface between a full-speed USB 2.0 bus and the APB bus. The clock source must use a HSE crystal oscillator.
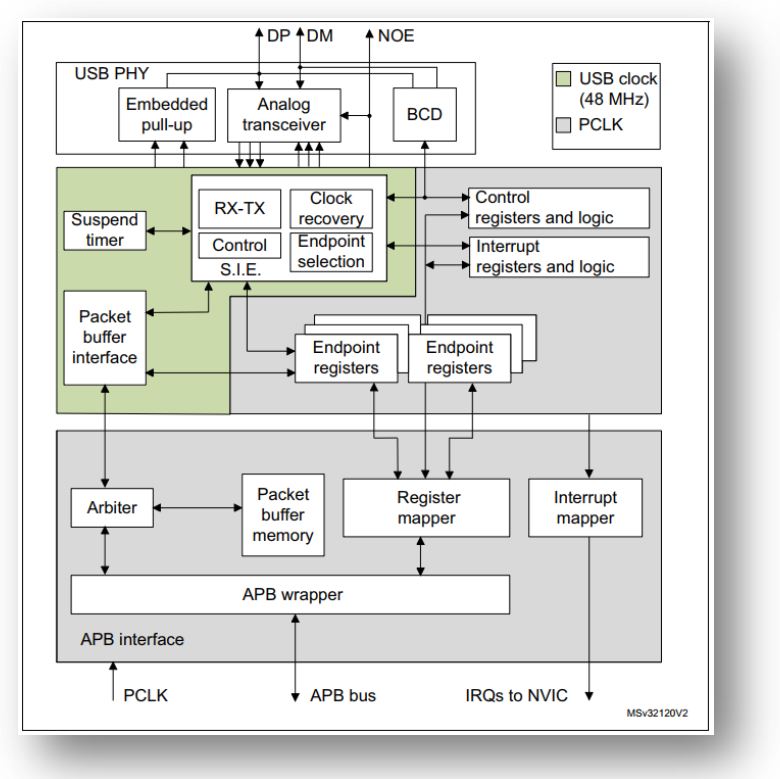
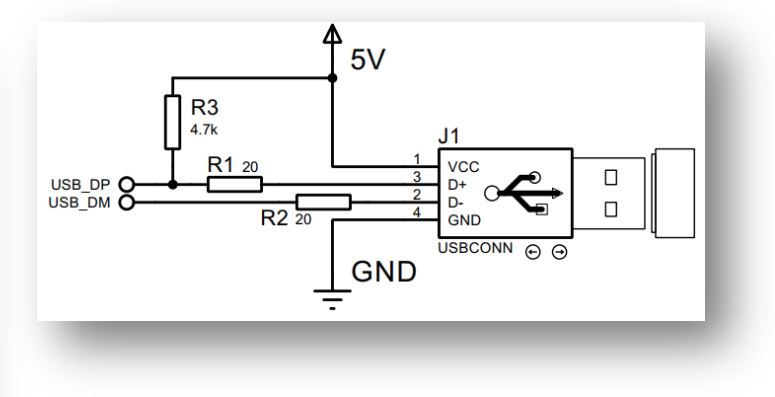
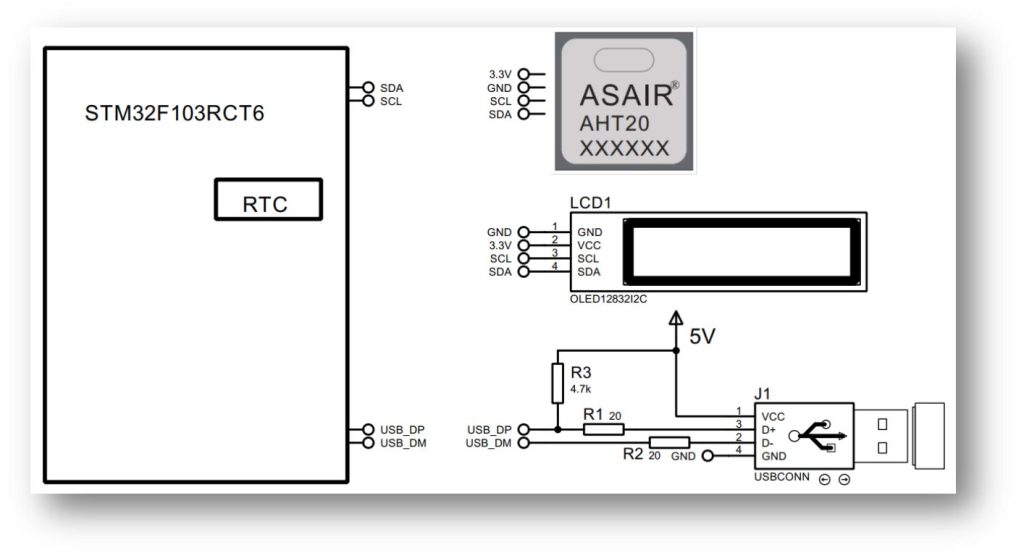
Connection Diagram
Not all STM32 has this USB feature. USB 2.0 version support 3 different speed i.e. low speed 1.5Mb/s, full speed 12Mb/s & high speed 480Mb/s. Let’s look at the different class of USB-
- Audio Device: This class allows the implementation of audio devices such as headphones and microphones.
- Communication Device: This class allows the implementation of virtual COM ports and modems.
- Download Firmware Update (DFU): Device Firmware Upgrade (DFU) is a process of updating or replacing the firmware of a hardware device. Firmware is the low-level software embedded in hardware components that controls their functionality.
- Human Interface Devices (HID): This class allows the implementation of Human Interface devices allowing the interaction between a human and a machine such as game controllers, mouse, keyboards.
- Custom HID: A Custom HID (Human Interface Device) refers to a device that uses the USB HID protocol for communication but is designed for specific, custom purposes not covered by standard HID device types like keyboards, mice, or game controllers.
- Mass Storage Class: This class allows the implementation of mass storage devices ensuring data storage and exchange via USB.
In this article we use USB Communication Device class for display real time sensor data to PC. Here we use simple sensor AHT20. AHT20, as a new generation of temperature and humidity sensors, has established a new standard in size and intelligence. Its uses communication protocol as I2C & is very simple to operate.
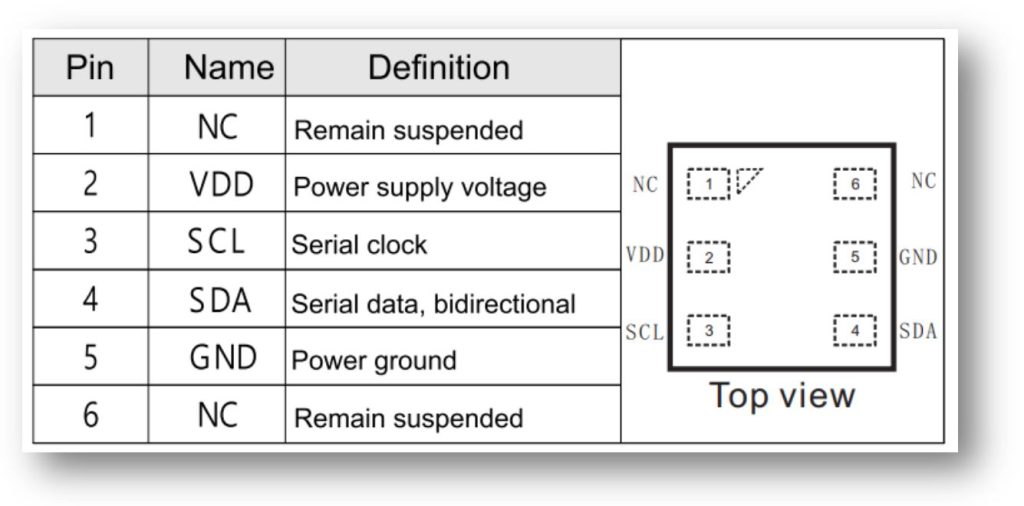
The power supply range of AHT20 is 2.0-5.5V, and the recommended voltage is 3.3V. Please read the data sheet first. According to the data sheet the device has I2C address of 0x38. In order to read temperature & humidity only three step will need-

In is tutorial we use STM32F103RCT6 microcontroller. I use I2C1 for OLED display purpose & I2C2 for AHT20 temperature & humidity measurement. You can use only 1 I2C protocol. Let’s look at the code for interfacing which is very simple.
#define AHT20_ADD    0x38
#define AHT20_INIT   0xBE
#define AHT20_RESET  0xBA
#define AHT20_TRIG   0xAC
uint8_t Tx_Soft[1]={AHT20_RESET};
uint8_t Tx_INIT[3]={AHT20_INIT,0x08,0x00};
uint8_t Tx_Trig[3]={AHT20_TRIG,0x33,0x00};
uint8_t Rx_Data[6];
HAL_Delay(1000);
HAL_I2C_Master_Transmit(&hi2c2,AHT20_ADD<<1,Tx_INIT,3,200);
HAL_I2C_Master_Transmit(&hi2c2,AHT20_ADD<<1,Tx_Trig,3,200);
HAL_Delay(100);
HAL_I2C_Master_Receive(&hi2c2,(AHT20_ADD<<1|0x01),Rx_Data,6,200);
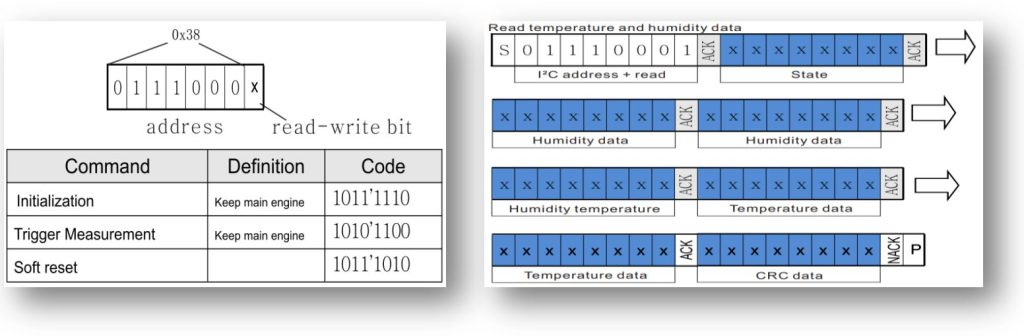
Here Rx_Data[6] represents the temperature & humidity data. Rx_Data[0] -> bit 7 represent measurement flag & bit 3 represent calibration flag. Rx_Data[1], Rx_Data[2] & Rx_Data[3] -> upper 4 bits represent humidity. Rx_Data[4] -> lower 4 bits, Rx_Data[5] & Rx_Data[6] represents temperature. For calculation of
Temperature = (ST /220 )*200-50 Centigrade & Humidity = (SRH /220 )*100 % , 220 = 1048576
uint32_t Temperature,humidity;
float tem,hum;
humidity=(Rx_Data[1]<<12)+(Rx_Data[2]<<4)+(Rx_Data[3]>>4);
hum=(float)humidity/1048576*100;
Temperature=((Rx_Data[3]&0x0f)<<16)+(Rx_Data[4]<<8)+(Rx_Data[5]);
tem=((float)Temperature/1048576)*200-50;
Here I use internal RTC feature for Real time weather forecasting. Here I use OLED for display purpose, if you don’t want to display ignore OLED section. Let’s initialize the RTC & use some string function for data transmitting to PC/Laptop.
RTC_TimeTypeDef sTime;
RTC_DateTypeDef sDate;
char display_time[16],display_date[16], display_AHT20[16];
char Time_Zone[32],Weather_Data[32], PC_Monitor[64];
char *day_name[8]={"Sun","Mon", "Tue", "Wed", "Thu", "Fri", "Sat"};
HAL_RTC_GetTime(&hrtc,&sTime,RTC_FORMAT_BCD);
HAL_RTC_GetDate(&hrtc,&sDate,RTC_FORMAT_BCD);
sprintf(display_time," %02X:%02X:%02X ",sTime.Hours,sTime.Minutes,sTime.Seconds);
sprintf(display_date," %02X/%02X/%02X %s",sDate.Date,sDate.Month,sDate.Year,day_name[sDate.WeekDay]);
sprintf(Time_Zone,"%s Time %s",display_date,display_time);
sprintf(Weather_Data,"Weather %02.2f C %02.2f %c HR",tem,hum,37);
sprintf(PC_Monitor,"%s%s\r",Time_Zone,Weather_Data);
Our final step is to transfer the string to PC/Laptop using STM32 USB Communication Device class. The code for USB Communication Device class-
#include "usbd_cdc_if.h"
CDC_Transmit_FS(PC_Monitor, strlen(PC_Monitor));
Data will send to PC without any external driver. Just Connect to PC/laptop according to the block diagram below. In PC-> Device manager see the Virtual Port number & in Realterm connect according to the port number with any baud rate. For setting all parameter please follow the youtube tutorial.


 IoTthingHuB


 Visit Today : 58
 Total Visit : 41174