
In this article we control multiple loads using single esp01 module. Before starting let’s have some review. In our ESP8266 as a SoftAP mode (AT Command Mode) article we use esp01 working as a command mode & STM32 as a core microcontroller. ESP01 can properly handle all the function as a core so no need for an external microcontroller. Here we use either PCF8574 or PCF8574A for load control, since it is an I2C device, we can control as many as load we wanted. Let’s begin with simple 3 steps- Step 1: The PCF8574A is an I2C parallel port expander with latch outputs with high-current drive capability for directly driving LEDs.
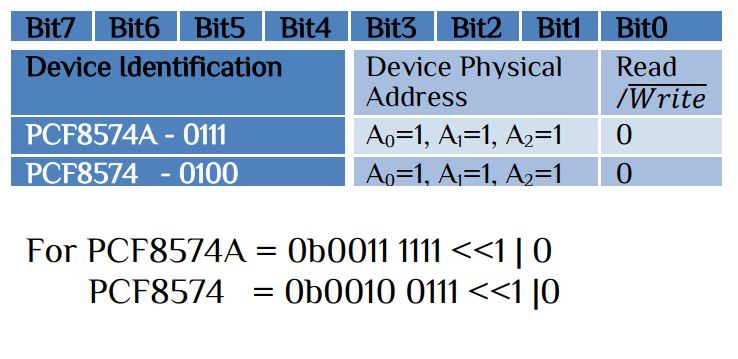
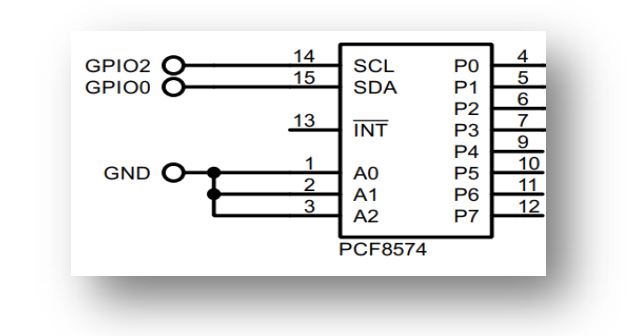
If we connect A0, A1, A2 pin to ground the default address will be 0b00100000 or 0x20. Chose either PCF8574A or PCF8574. Let’s you don’t know the I2C address & start from getting the I2C address. Connect GPIO2 to SCL & GPIO0 to SDA of the I2C device & before connecting, load the following program to the esp01 chip with GPIO0 to Ground connection. Remember for programming the esp01 you have to connect GPIO0 to GND thus enter esp01 into programming mode.
#include <Wire.h>
void setup() {
  Serial.begin(115200);
  Wire.begin(0, 2); // GPIO0 = SDA, GPIO2 = SCL
  Serial.println("Scanning I2C devices...");
}

void loop() {
  for (byte address = 1; address < 127; address++) {
    Wire.beginTransmission(address);
    if (Wire.endTransmission() == 0) {
      Serial.print("Device found at 0x");
      Serial.println(address, HEX);
    }
  }
  delay(10000);
}
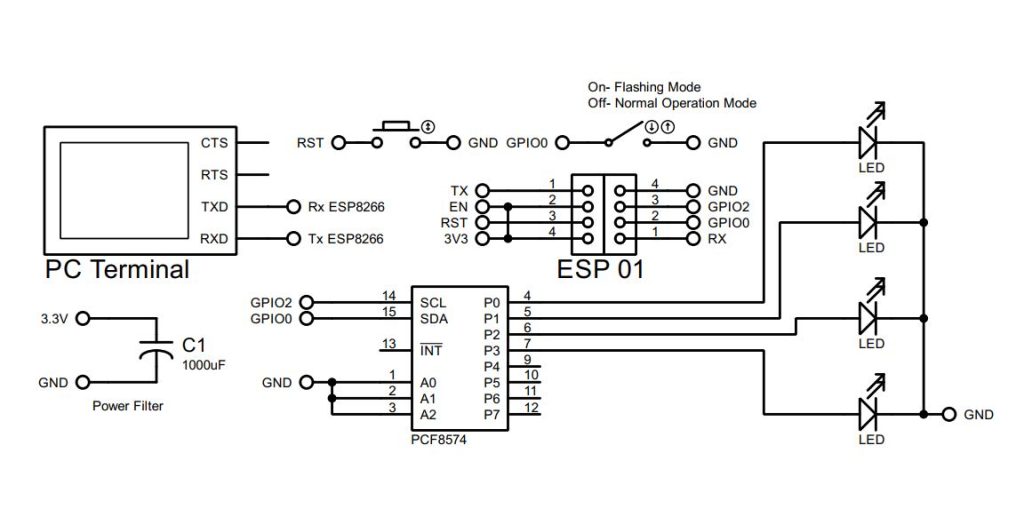
It is a very simple program to find out the I2C address of your IC device. Step2 : In first step you get the I2C address, assume it 0x20. In this step let’s see if it working or not. We sequentially turn Pin-P0, and then Pin-P1, then Pin-P2 & Pin-P4 and the process continues. Connect 4 LED’s & check the following program-
#include <Wire.h>
#define PCF8574_ADDR 0x20  // Default I2C address of PCF8574
void setup() {
  Wire.begin(0, 2); // GPIO0 = SDA, GPIO2 = SCL
}

void loop() {
  Wire.beginTransmission(PCF8574_ADDR);
  Wire.write(0b00000001);  // Turn ON first pin (P0)
  Wire.endTransmission();
  delay(1000);
  Wire.beginTransmission(PCF8574_ADDR);
  Wire.write(0b00000010);  // Turn ON second pin (P1)
  Wire.endTransmission();
  delay(1000);
  Wire.beginTransmission(PCF8574_ADDR);
  Wire.write(0b00000100);  // Turn ON third pin (P2)
  Wire.endTransmission();
  delay(1000);
  Wire.beginTransmission(PCF8574_ADDR);
  Wire.write(0b00001000);  // Turn ON forth pin (P3)
  Wire.endTransmission();
  delay(1000);
}
Step 3: In STM32 we enter softAP mode by AT command mode. Here we use Arduino platform. The default APIP is 192.168.4.1, but it can be changed. ESP01 only support class C IP address. A Class C IP address is a part of the IPv4 address classification system that was originally used to define network sizes. Address Range: 192.0.0.0 to 223.255.255.255 with Default Subnet Mask 255.255.255.0. Let’s use IP: 192.168.10.7, Gateway IP: 192.168.10.7 & Sub Netmask: 255.255.255.0 as-
#include <ESP8266WiFi.h>
#include <ESP8266WebServer.h>
const char* ssid = "IoTthingHuB";    // provide any SSID Name
const char* password = "Test123456"; // provide any SSID Password
WiFiServer server(80);               // Server port 80
IPAddress local_ip(192,168,10,7);    // Provide Class C IP
IPAddress gateway(192,168,10,7);     // Provide Class C GateWay
IPAddress subnet(255,255,255,0);     // Default SubNet (Not Changable)
WiFi.softAP(ssid, password);         // Creating Soft Access Point
WiFi.softAPConfig(local_ip,gateway,subnet);
Serial.println("Access Point Started!");
server.begin();
HTML code will be same as STM32 article with change of 4 Load to Control.
- HTML code: Off condition
<!DOCTYPE html> <html>
<head><meta name=\"viewport\" content=\"width=device-width, initial-scale=1.0, user-scalable=no\">
<title>Load Control</title>
<style>html { font-family: ZCOOL XiaoWei; display: inline-block; margin: 2px auto; text-align: center;}body{margin-top: 40px;}
h1 {color: #0e18f3;margin: 45px auto 25px;}
h3 {color: #050505;margin-bottom: 40px;}
.button {display: block;width: 60px;background-color: #b589f0;border: none;color: white;padding: 15px 25px;text-decoration: none;font-size: 20px;margin: 0px auto 30px;cursor: pointer;border-radius: 5px;}
.button-on {background-color: #b589f0;}
.button-on:active {background-color: #2fd4e0;}
.button-off {background-color: #65537a;}
.button-off:active {background-color: #2fd4e0;}
 p {font-size: 16px;color:#040404;margin-bottom: 12px;}
</style></head><body><h1>Simple Web Server</h1>
<h3> IoT ThingHuB </h3>
<p>LOAD 1 Status: OFF</p><a class=\"button button-on\" href=\"/LED1on\">ON</a>
<p>LOAD 2 Status: OFF</p><a class=\"button button-on\" href=\"/LED2on\">ON</a>
<p>LOAD 3 Status: OFF</p><a class=\"button button-on\" href=\"/LED3on\">ON</a>
<p>LOAD 4 Status: OFF</p><a class=\"button button-on\" href=\"/LED3on\">ON</a>
</body>
</html>
HTML code: On condition
Simple Web Server
IoT ThingHuB
LOAD 1 Status: ON
OFFLOAD 2 Status: ON
OFFLOAD 3 Status: ON
OFFLOAD 4 Status: ON
OFF
<!DOCTYPE html> <html>
<head><meta name=\"viewport\" content=\"width=device-width, initial-scale=1.0, user-scalable=no\">
<title>Load Control</title>
<style>html { font-family: ZCOOL XiaoWei; display: inline-block; margin: 2px auto; text-align: center;}body{margin-top: 40px;}
h1 {color: #0e18f3;margin: 45px auto 25px;}
h3 {color: #050505;margin-bottom: 40px;}
.button {display: block;width: 60px;background-color: #b589f0;border: none;color: white;padding: 15px 25px;text-decoration: none;font-size: 20px;margin: 0px auto 30px;cursor: pointer;border-radius: 5px;}
.button-on {background-color: #b589f0;}
.button-on:active {background-color: #2fd4e0;}
.button-off {background-color: #65537a;}
.button-off:active {background-color: #2fd4e0;}
 p {font-size: 16px;color:#040404;margin-bottom: 12px;}
</style></head><body><h1>Simple Web Server</h1>
<h3> IoT ThingHuB </h3>
<p>LOAD 1 Status: ON</p><a class=\"button button-off\" href=\"/LED1off\">OFF</a>
<p>LOAD 2 Status: ON</p><a class=\"button button-off\" href=\"/LED2off\">OFF</a>
<p>LOAD 3 Status: ON</p><a class=\"button button-off\" href=\"/LED3off\">OFF</a>
<p>LOAD 4 Status: ON</p><a class=\"button button-off\" href=\"/LED4off\">OFF</a>
</body>


 IoTthingHuB


 Visit Today : 58
 Total Visit : 41174