
In my recent article we use esp01 microcontroller work as AT command mode to interface with STM32 for wireless communication. Esp01 is a powerful microcontroller to perform lots of function. It has 2 GPIO pin for controlling load and Tx & Rx pin for programming. Simple UART module i.e. FTDI can program the chip. For programming we can use many platform but simplest to use Arduino Platform. For simply download go to-
https://www.arduino.cc/en/software
For programming the pin connection as follow-
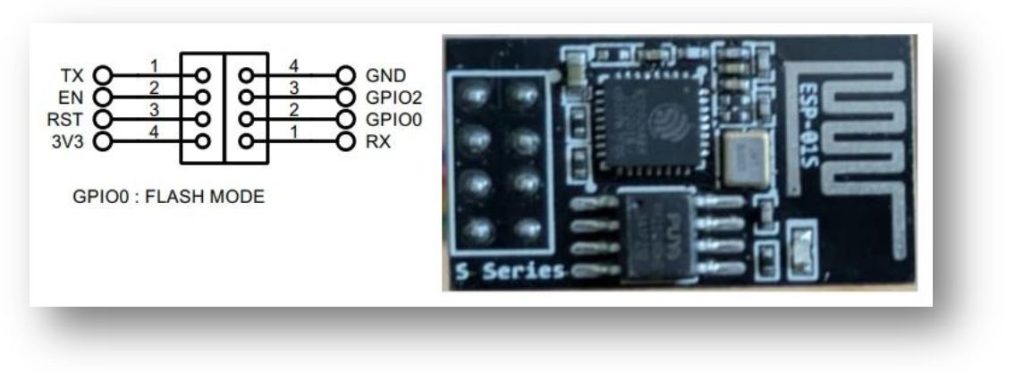
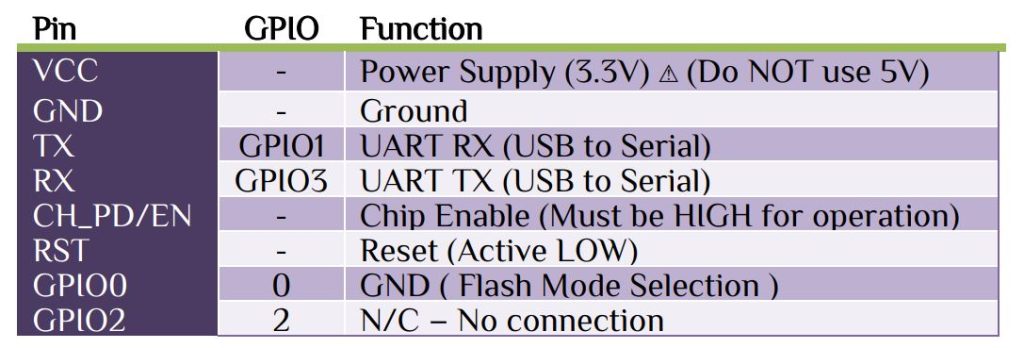
The ESP8266 has three boot modes as follow-

Reminder: Tx(GPIO0) & Rx(GPIO3) both can be used as GPIO pin, buts once it used as GPIO the esp01 can never be program again. So be careful to select the GPIO.
You may think only 2 GPIO pin so what can the chip perform. In our TFT display Today Exchange Rate BDT article we display live Exchanged Rate in BDT. In this article we only use esp01 mcu & OLED for display purpose. Let’s begin with some settings-
- Install the latest version of Arduino : https://www.arduino.cc/en/software/
- In Arduino: File>Preferences>Setting
http://arduino.esp8266.com/stable/package_esp8266com_index.json
- In Arduino Install: Tools>Board
esp8266
- In Arduino: Tools>Board>esp8266>Generic ESP8266 Module
- In Arduino Install: Library Manager
ESP8266 and ESP32 OLED driver for SSD1306 display
If it see complex see my YouTube Video for details. We read the data from ThingSpeak ThingHTTP service. For your simply city just go to the link it will display in raw data-
GET https://api.thingspeak.com/apps/thinghttp/send_request?api_key=MET1M2GLDSKNNMJV
Use POSTMAN or any browser and you get the data, since it is a GET request. Let’s see the connection diagram-
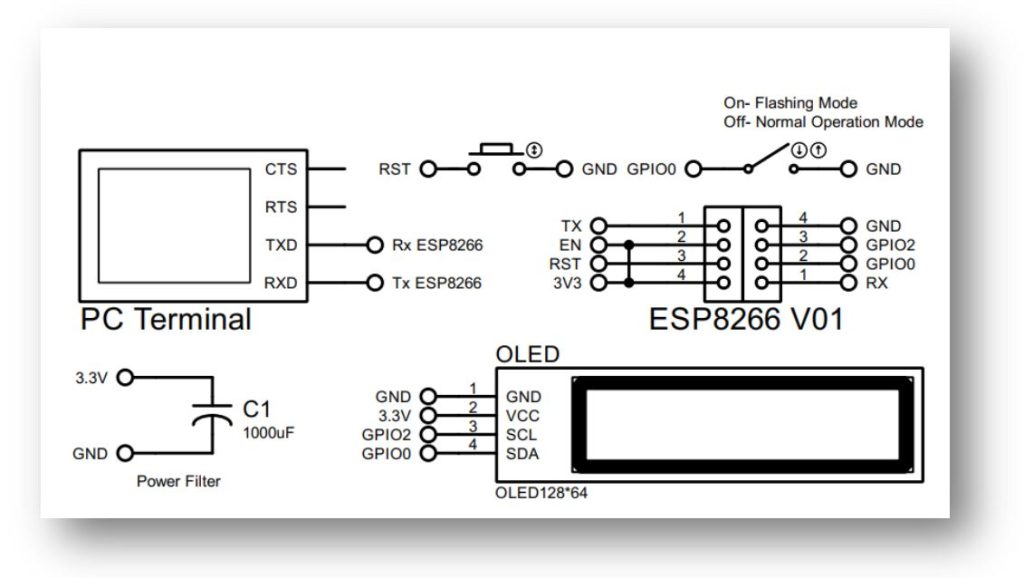
Reminder: The power problem is the major problem of esp01. You can minimize it by using 1000uF capacitor. If the capacitor can’t solve your problem, then it recommended soldering all components into PCB board.
Let’s look at the programming part-
#include <ESP8266WiFi.h>
#include "SSD1306Wire.h"               // legacy: #include "SSD1306.h"
#include "Dialog_plain_8.h"
#define  SDA_ESP8266_V01   0           // GPIO0 pin for SDA
#define  SCL_ESP8266_V01   2           // GPIO2 pin for SCL
SSD1306Wire display(0x3c, SDA_ESP8266_V01 , SCL_ESP8266_V01);   // ADDRESS, SDA, SCL

// WiFi credentials
const char* ssid = "Your_WiFi_SSID";       // Your WiFi SSID
const char* password = "Your_WiFi_Password";   // Your WiFi Password

// ThingHTTP settings
const char* host = "api.thingspeak.com";
const String thingHTTPKey = "MET1M2GLDSKNNMJV";               // Your API key

WiFiClient client;

void setup() {
  Serial.begin(115200);

  display.init();
  display.clear();
  display.flipScreenVertically();
  display.setFont(ArialMT_Plain_16);  // Front : ArialMT_Plain_10/16/24
  display.drawString(0, 0,"Connecting WiFi...");
  display.display();
  WiFi.begin(ssid, password);
  while (WiFi.status() != WL_CONNECTED) {
    delay(500);
    Serial.print(".");
  }

  display.clear();
  delay(1000);
  display.drawString(0, 0, "WiFi Connected!");
  display.display();
  delay(1000);
  display.setFont(Dialog_plain_8);  // Creating Smaill Front
}

void loop() {
  if (client.connect(host, 80)) {
    String url = "/apps/thinghttp/send_request?api_key=" + thingHTTPKey;

    client.print(String("GET ") + url + " HTTP/1.1\r\n" +
                 "Host: " + host + "\r\n" +
                 "Connection: close\r\n\r\n");

    // Skip headers
    while (client.connected()) {
      String line = client.readStringUntil('\n');
      if (line == "\r") break;
    }

    // Read and process response
    String data = client.readString();
    client.stop();

    // Debug output
    Serial.println("Raw HTML:");
    Serial.println(data);

    // Extract values from <td> tags
    String tokens[12];
    int index = 0;
    int start = 0;

    while ((start = data.indexOf("<td>", start)) != -1 && index < 12) {
      int end = data.indexOf("</td>", start);
      if (end == -1) break;
      tokens[index++] = data.substring(start + 4, end);
      start = end + 5;
    }

    // tokens[0] = USD, tokens[1] = 121.0000, tokens[2] = 122.0000, etc.

    display.clear();
    display.println("CUR       BUY       SELL");
    display.println("------------------------------------");

    for (int i = 0; i < 12; i += 3) {
      display.printf("%s  %.4f   %.4f\n",
        tokens[i].c_str(),
        tokens[i+1].toFloat(),
        tokens[i+2].toFloat()
      );
    }
  } else {
    Serial.println("Connection failed");
  }

  delay(30000); // Update every 30 seconds
}
Open new sketch & past the program along with changing of your WiFi SSID & Password. Copy the front library & Paste it into the project folder-


 IoTthingHuB


 Visit Today : 58
 Total Visit : 41174