
In our previous article we discuss about Access Point Network, in this article we discuss about ESP8266 station mode. For connecting with your 2.4GHz router & basic command please see my WiFi Load Control article. Setting the ESP8266 to Station Mode (STA) allows it to connect to an existing Wi-Fi network. This enables it to communicate with other devices, send data to the cloud, or host a web server.
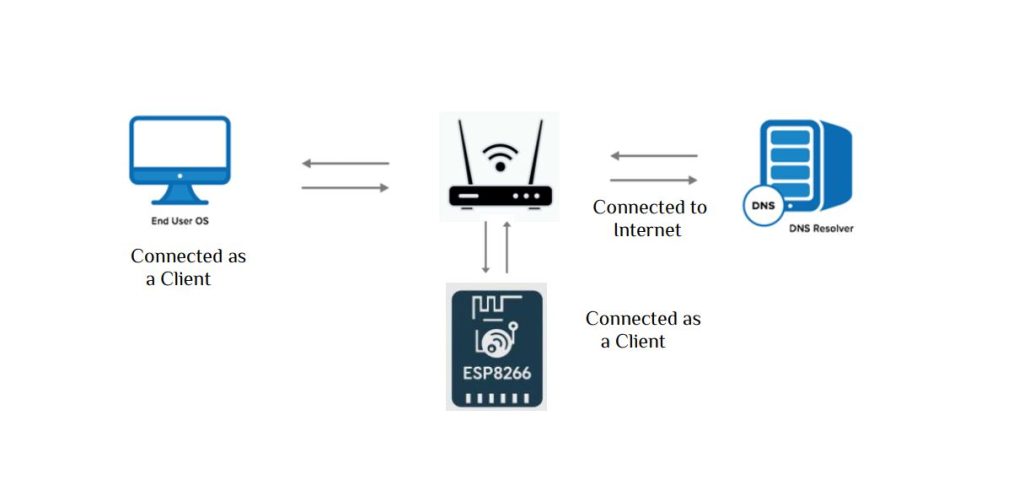
Before starting please go through my previous articles for some basic knowledge of ESP8266 module. Before starting let’s see some command mode that we need in this article.
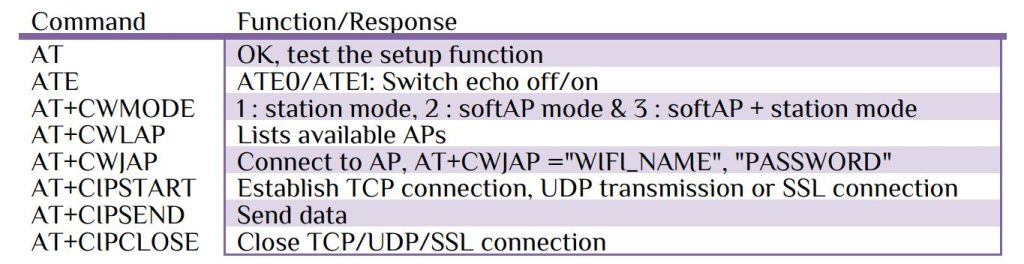
Let’s see the command parameters & there uses. Simple AT command return OK string with carriage return & new line. If we send ATE0 it will stop echo otherwise echo comes. Command AT+CWMODE define the mode of operations. In this article we use ESP8266 as a Station. The AT+CWLAP command will show the available networks for esp8266 access point. If it doesn’t show your router name, please enable the 2.4GHz frequency bandwidth. Connect your router with AT+JAP command. Let’s look at the program for setup-
char WIFI_NAME[] = "SSID";       // WiFi Name
char WIFI_PASS[]  = "Password";  // WiFi Password
char display[1023],wifi_send[200],RX_ST[1023],TX_ID[20];
uint8_t rx_char;
uint16_t count;
extern UART_HandleTypeDef huart1;
//-------------- Rx Callback Function -----
void HAL_UART_RxCpltCallback(UART_HandleTypeDef *huart)
{
  if(huart->Instance== USART1)
  {
    display[count++]=rx_char;
    HAL_UART_Receive_IT(&huart1,&rx_char,1);
  }
}
void ESP8266_Setup(void)
{
	ESP8266_TX("AT\r\n","OK",4000);                // Device Checking
	ESP8266_TX("ATE0\r\n","OK",4000);              // ECHO OFF
	ESP8266_TX("AT+CWMODE=1\r\n","OK",4000);       // Station Mode
	sprintf(wifi_send,"AT+CWJAP=\"%s\",\"%s\"\r\n",WIFI_NAME,WIFI_PASS);
	ESP8266_TX(wifi_send,"GOT IP",8000);           // Connected to Internet
	memset (display, '\0',1023);                   // clear the buffer
	count=0;
}
void ESP8266_TX(char *b_send,char *return_string,uint16_t delay_time)
{
	char ESP8266_TX[10];
	sprintf(ESP8266_TX,"%s",return_string);
            sprintf(wifi_send,"%s",b_send);
	HAL_UART_Transmit(&huart1,(uint8_t*)wifi_send,strlen(wifi_send),1000);
	while(1)
	{
		sprintf(RX_ST,"%s",display);
		if(strstr(RX_ST,ESP8266_TX)) break;
	}
	HAL_Delay(delay_time);
	memset (display, '\0',1023);   // clear the buffer
	memset (wifi_send,'\0',200);   // clear the buffer
	memset (RX_ST, '\0',1023);     // clear the buffer
	count=0;
}
After setup the next step is to collect data from webpage & display it on screen. Here I use UART1 for ESP8266 & I2C2 for display purpose. In this article we get the data from following 2 website-
By default at AT+CIPMUX=0 or Single connection mode, Establish TCP connection, UDP transmission or SSL connection–
cmd> AT+CIPSTART=<type>, <remote IP>, <remote port>
Here type is either TCP or UDP or SSL. Let’s look at the basic different-
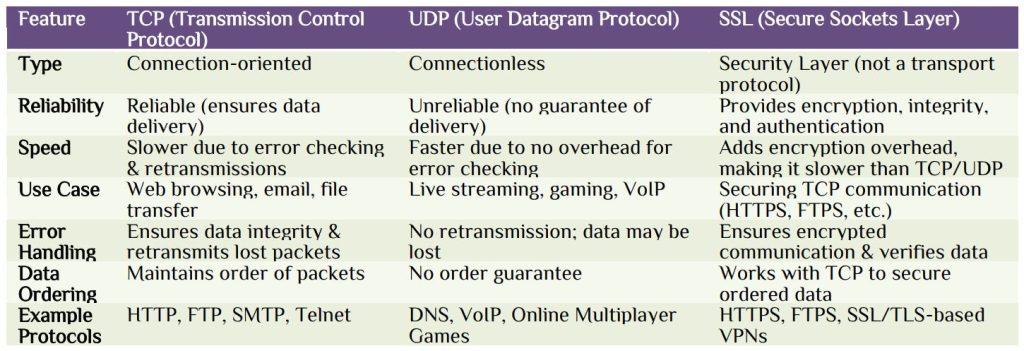
<remote IP> is either the name of the domain or IP address of the website. Example 142.251.40.142 is IP of www.google.com. In networking, port numbers are used to distinguish different types of services. Here’s a breakdown of TCP and SSL/TLS ports commonly used for different applications:
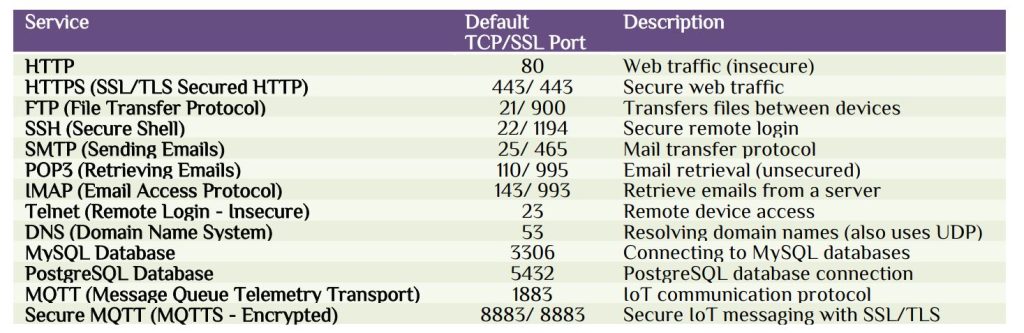
For example connected to the server with HTTP TCP protocol with port number 80-
- AT+CIPSTART=”TCP”,”api.openweathermap.org”,80\r\n
- AT+CIPSTART=”TCP”,”api.timezonedb.com”,80\r\n
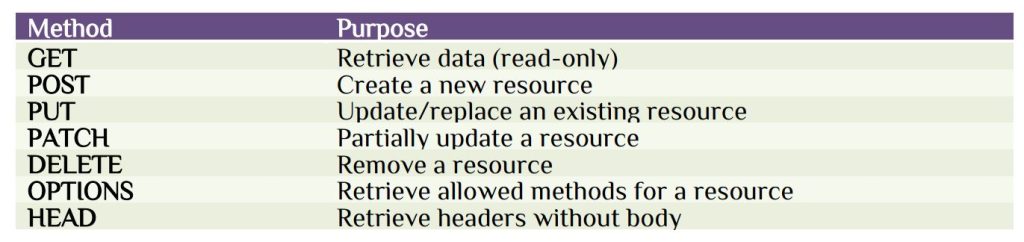
Next command is AT+CIPSEND to transmit string to the server. Connecting with a server typically involves making HTTP requests using various methods, each serving a specific purpose. Below are the main HTTP methods, along with details on how they are used:
For example the current weather data to make an API call-
https://api.openweathermap.org/data/2.5/weather?lat={lat}&lon={lon}&appid={API key}
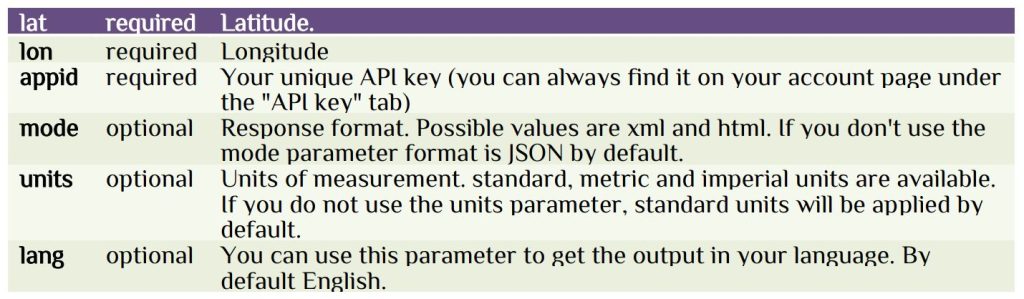
The response will be the current weather update. By default the temperature is show in standard mode which is Kelvin. You can change it to Celsius value by using matric mode. Example-
https://api.openweathermap.org/data/2.5/weather?lat={lat}&lon={lon}&appid={API key} &units=metric
Most of our browser we only apply GET method & for other method we need APP, most popular is the Postman. Here we use GET method-
GET https://api.openweathermap.org/data/2.5/weather?lat={lat}&lon={lon}&appid={API key} &units=metric\r\n\r\n\r\n
char latitude[]          = "Your Latitude";
char longitude[]         = "Your Longitude ";
char API_Key_weather[]   = "Your unique API key";
sprintf(wifi_send,"AT+CIPSTART=\"TCP\",\"api.openweathermap.org\",80\r\n");
ESP8266_TX(wifi_send,"CONNECT",200);
sprintf(wifi_send,"GET https://api.openweathermap.org/data/2.5/weather?lat=%s&lon=%s&appid=%s&units=metric\r\n\r\n\r\n",latitude,longitude,API_Key_weather);
sprintf(TX_ID,"AT+CIPSEND=%d\r\n",strlen(wifi_send));
ESP8266_TX(TX_ID,">",100);                    // Creating LINK
sprintf(wifi_send,"GET https://api.openweathermap.org/data/2.5/weather?lat=%s&lon=%s&appid=%s&units=metric\r\n\r\n\r\n",latitude,longitude,API_Key_weather);
HAL_UART_Transmit(&huart1,(uint8_t*)wifi_send,strlen(wifi_send),1000);
The program will return all the parameter in JSON format, filter your desire data. Let’s use another format of reserving data form https://timezonedb.com. Get current local time at Statue of Liberty using latitude & longitude-
http://api.timezonedb.com/v2.1/get-time-zone?key={API key} &by=position&lat={lat}&lng={lon}
The default format is XML, you can change it to JSON (JavaScript Object Notation) format. Here we use GET method-
GET /v2.1/get-time-zone?key={API key} &format=json&by=position&lat={lat}&lng={lon} HTTP/1.0\r\nHost: api.timezonedb.com\r\n\r\n\r\n
char API_Key_time[]      = "Your unique API key ";
sprintf(wifi_send,"AT+CIPSTART=\"TCP\",\"api.timezonedb.com\",80\r\n");
ESP8266_TX(wifi_send,"CONNECT",200);
sprintf(wifi_send,"GET /v2.1/get-time-zone?key=%s&format=json&by=position&lat=%s&lng=%s HTTP/1.1\r\nHost: api.timezonedb.com\r\n\r\n\r\n",API_Key_time,latitude,longitude);
sprintf(TX_ID,"AT+CIPSEND=%d\r\n",strlen(wifi_send));
ESP8266_TX(TX_ID,">",100);                    // Creating LINK
sprintf(wifi_send,"GET /v2.1/get-time-zone?key=%s&format=json&by=position&lat=%s&lng=%s HTTP/1.1\r\nHost: api.timezonedb.com\r\n\r\n\r\n",API_Key_time,latitude,longitude);
HAL_UART_Transmit(&huart1,(uint8_t*)wifi_send,strlen(wifi_send),1000);
HTTP/1.0 and HTTP/1.1 are different versions of the HyperText Transfer Protocol (HTTP), with HTTP/1.1 introducing significant improvements over HTTP/1.0. Below are the key differences:

The received data string contents all the time information, filter your desire section. Let’s use a timer for schedule calling the remote website. We will use TIM17 general purpose time to create interrupt at every 1s. Let’s use system clock as 48MHz fsys = 48MHz and prescaler value 4799, so the new clock frequency for TIM17 is-
fTIM17 = fsys / (prescaler +1) = 48MHz/(4799+1) = 10kHz & tTIM17 = .01ms
So the TIM17 new frequency fTIM17 = 10kHz.The Couter Period has a maximum value of 216-1 or 65535. If Couter Period ARR = 9999, the delay for every interrupt will be 1s.
uint8_t min,second;
uint16_t timer_count;
void HAL_TIM_PeriodElapsedCallback(TIM_HandleTypeDef *htim)
{
	if(htim->Instance== TIM17)
	{
		second++;
		if(second>60)
			{
					timer_count++;
					min++;second=0;
			}
	}
}
Here I describe the basic structure & full steps one by one. It is not best practice to use STM32 as core & ESP8266 as slave, because the ESP8266 can properly handle all the command & a development board for lots of more function. We will do all the staff with only a single ESP8266 module in some other article. For device setting & how it works please see my YouTube video, keep learning.


 IoTthingHuB


 Visit Today : 58
 Total Visit : 41174